

Walk into a room with crown molding and trim, and it feels finished. Walk into one without it, and something often feels missing. The walls meet the ceiling in a plain line, the floor meets the wall with a bare edge, and the doors look flat.
Crown molding and trim add depth, shape, and character to a space. They can also hide gaps, cover rough joints, and raise the perceived value of a home.
This guide covers the basics: styles, materials, installation, costs, and common mistakes. Whether you plan a DIY project or want to hire a professional, you will know what to expect.
What Is Crown Molding and Trim?
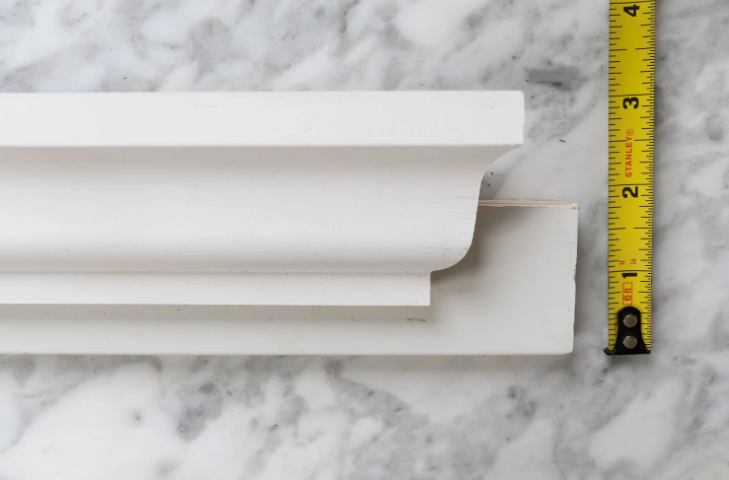
Crown molding is a decorative strip that runs along the top of a wall where it meets the ceiling. It is usually installed at an angle, which creates a soft transition between the two surfaces.
Trim is the wider category. It includes any finishing piece that frames or covers an edge inside a home. Common types include:
- Baseboards along the bottom of walls
- Door and window casings
- Chair rails and picture rails
- Wainscoting caps
- Crown molding at the ceiling line
Together, these pieces form a visual frame for a room. Decorative trim work does more than look good. It also protects wall edges from bumps and conceals the small gaps that appear where materials meet.
Popular Crown Molding Styles and Materials
Choosing a style starts with the look you want and the age and design of your home. Material comes next, and it affects price, durability, and how the finished piece looks once painted.
Traditional Crown Molding Styles
Traditional profiles feature curves, layers, and detailed shapes. Some of the most common include:
- Cove: a simple concave curve that suits many homes
- Egg and dart: a classic pattern with rounded and pointed shapes in a repeating row
- Dentil: small block shapes that echo old Greek and Roman architecture
- Beaded: a row of small rounded details along the edge
These styles work well in colonial, Victorian, and formal homes. They look best in rooms with higher ceilings, where the detail has room to breathe.
Modern and Minimalist Trim Designs
Modern trim keeps lines clean and shapes simple. Flat profiles, square edges, and shallow angles are common. Some designers skip traditional crown altogether and use a slim, flat band or a shadow gap for a sharp, gallery style finish.
Minimalist trim suits contemporary homes, small rooms, and spaces where the goal is calm rather than drama. Painting the trim the same color as the wall is a popular way to keep the look quiet and seamless.
Choosing the Right Material for Your Space
Each material has strengths and weaknesses.
- MDF: affordable, smooth, and easy to paint. It does not handle moisture well, so it suits dry rooms.
- Solid wood: strong and beautiful, especially when stained. It costs more and can expand or shrink with humidity.
- PVC or vinyl: resists water and rot, which makes it a smart pick for bathrooms and kitchens.
- Polyurethane or foam: light, easy to cut, and good for ornate profiles. It is often used for detailed ceiling work.
- Plaster: the traditional option for historic homes. It is heavy and needs skilled installation.
If you are unsure, think about the room first. Moisture, traffic, and finish (painted or stained) should guide your choice.
How Crown Molding Installation Works
Crown molding installation looks simple from the ground, but it demands careful measuring and cutting. The pieces sit at an angle, so the cuts are more complex than they appear.
Here is the general process:
- Measure the room. Record the length of every wall and add extra for waste.
- Mark the wall. Find studs and draw a guide line where the molding will sit.
- Cut the corners. Inside corners are often coped, meaning one piece is shaped to fit the profile of the other. Outside corners are usually mitered.
- Fix the molding. It is attached with a nail gun into studs and the ceiling frame, often with adhesive as well.
- Fill and sand. Nail holes and seams are filled with caulk or filler, then sanded smooth.
- Paint or stain. The final coat brings everything together.
Walls and ceilings are rarely perfectly straight. That is why experienced installers rely on coping and caulk to keep joints tight, even when a corner is slightly off.
Decorative Trim Work for Different Rooms
The same trim will not suit every space. Room size, ceiling height, and purpose all matter.
Crown Molding for Living Rooms and Dining Areas
These are the rooms where guests spend time, so they often benefit from bolder profiles. A wider crown with layered detail can make a dining room feel formal. In a living room, a medium profile paired with matching baseboards gives a balanced, polished look.
If the ceiling is high, a taller crown helps fill the space. If it is lower, a slimmer profile prevents the room from feeling heavy.
Trim Ideas for Bedrooms and Hallways
Bedrooms call for calm. Soft curves and light colors work well. A simple cove crown with matching baseboards creates a peaceful feel without adding clutter.
Hallways often get overlooked, but trim can bring them to life. Picture rails or chair rails add interest to long, narrow walls. Painting the trim in a contrasting shade can also guide the eye down the corridor.
Using Trim to Highlight Architectural Features
Trim can draw attention to what is already special about a room. Wide casings can make windows feel larger. Molding around a fireplace can turn it into a focal point. Box trim or wainscoting can add structure to a plain wall.
The idea is to support the architecture, not compete with it. Choose trim that echoes the lines already in the space.
Baseboard and Door Trim Options
Baseboard and door trim are the workhorses of interior finishing. They protect walls from scuffs and give doorways a defined frame.
Baseboards come in many heights. Taller boards, around five to seven inches, feel more substantial and modern. Shorter boards suit older or smaller homes. Some baseboards use a stacked design, where a cap piece sits above a flat board for extra detail.
Door trim is called casing. Common styles include:
- Flat casing: clean and simple, ideal for modern homes
- Craftsman casing: a thick header with a flat top piece, known for its sturdy look
- Colonial casing: curved profiles with a traditional feel
For a cohesive result, match the door casing, window casing, and baseboards in style and finish. The details can vary, but the overall design language should stay consistent.
Custom Crown Molding and Design Ideas
Stock profiles work well for most homes, but custom crown molding opens up more possibilities. A custom profile can match a historic home, repair a missing section, or create a one of a kind look.
Some popular custom ideas include:
- Layered crown: stacking two or three pieces to create a larger, richer profile
- Cove lighting: placing LED strips behind the crown so light glows on the ceiling
- Coffered ceilings: using trim to build a grid pattern overhead
- Stepped profiles: adding shadow lines for a more dramatic look
Custom work costs more and takes longer, but it can transform a room. It is often worth it for main living areas, entryways, and homes with unusual dimensions.
Interior Trim Installation: What to Expect
If you hire out the job, knowing the steps helps you plan. Interior trim installation usually starts with a site visit, where the installer measures, checks walls, and discusses profiles.
Expect these stages:
- Preparation: rooms may need to be cleared, and floors protected.
- Delivery and acclimation: wood and MDF often sit in the room for a day or two so they adjust to indoor humidity.
- Installation: this is the loudest and busiest stage, with cutting and nailing.
- Finishing: caulking, filling, and painting follow.
A single room can take a day or two, while a full house can take a week or more. Painting adds time, so ask whether it is included in the quote. If you want a professional crown molding and trim result, ask to see past projects before you commit.
How Much Does Crown Molding and Trim Cost?
Costs vary widely by region, material, and complexity. The figures below are rough estimates in US dollars and should be treated as a starting point.
- MDF crown molding: roughly $1 to $4 per linear foot for material
- Solid wood crown molding: roughly $4 to $15 or more per linear foot
- Installed crown molding: often $6 to $25 or more per linear foot, depending on the job
- Baseboards: often $3 to $10 per linear foot installed
- Custom or plaster work: higher, and quoted per project
Several factors change the final price:
- Ceiling height and how hard the work is to reach
- Number of corners, since each one adds cutting time
- Profile complexity and layering
- Whether painting or staining is included
- Removal of old trim
Always ask for a written quote that lists materials, labor, and finishing. Getting two or three quotes from local crown molding and trim providers helps you compare fairly.
Common Installation Mistakes to Avoid
Even small errors can be very visible in trim work. Watch out for these:
- Skipping measurements: ordering too little means delays, and mixing batches can cause color differences.
- Poor corner cuts: gaps at the corners are the most noticeable flaw. Coping inside corners gives a tighter fit.
- Ignoring studs: trim fixed only to drywall can loosen over time.
- Wrong material for the room: MDF in a damp bathroom may swell.
- Rushing the finish: unfilled nail holes and thin caulk lines show up once painted.
- Choosing the wrong scale: oversized crown in a small room feels heavy, while tiny trim in a large room disappears.
Taking time on preparation usually saves time and money later.
How to Choose the Right Crown Molding and Trim
Start with your home. Match the style to its age and design. Then consider the room: ceiling height, moisture, and how much detail the space can carry.
Keep these tips in mind:
- Bring home small samples and view them in your own lighting.
- Keep trim styles consistent from room to room.
- Set a budget early, and include finishing costs.
- Decide whether you want painted or stained trim before buying.
- Choose installers with proven experience, and ask for references.
If you plan to sell your home, classic and neutral profiles tend to appeal to the widest range of buyers. If it is your forever home, choose what you love.
Final Thoughts
Crown molding and trim are among the most effective ways to bring a room together. The right profile, material, and installation can change how a space looks and feels, and the details matter at every step.
Take your time, compare options, and focus on quality over speed. A well planned trim project will look good for many years.
